Tasks
Tasks generate traffic through different plugins.
Task and plugin model. In Peresvet ST, every individual traffic flow is represented by a separate plugin. A plugin is an independent unit that generates or processes a particular type of traffic (HTTP, WAF, DNS, UDP Flood, and more) with its own source, destination, protocol parameters, intensity, and duration. Each plugin performs one focused operation—for example, generating HTTP requests to a web server, sending DNS queries, or producing UDP load.
A task combines these plugins into one testing scenario. When creating a task, the user adds one or more plugins, each of which generates an independent traffic flow with its own parameters. In summary:
- a plugin is one traffic flow of a particular type, with independent generation or measurement settings;
- a task is a set of plugins that run together to form a complete load-testing scenario.
This architecture makes it possible to generate different types of traffic simultaneously in one task—for example, combine HTTP load with DNS queries and a UDP flow to model a realistic network profile. Each plugin is configured independently and can use a different agent, network interface, intensity, and duration.
Task List
The Tasks section is the central Peresvet ST workspace for managing network traffic generation and processing tasks.
The page lists all created tasks in a table with these columns:
| Column | Description |
|---|---|
| ID | Unique numeric task identifier |
| Publisher | User (email address and ID) who created the task |
| Status | Current task state, such as Completed (green check mark) |
| Started | Task start date and time |
| Completed | Task completion date and time |
| Created | Task creation date and time |
| Comment | Task comment; click to expand long text |
Actions appear at the right of each row: view (eye icon) and delete (trash icon).
At the top of the page:
- Search All Tasks filters by task ID, publisher, and comment;
- + New Task creates a traffic-generation task;
- the arrow to the right of New Task opens Create from Template and Import Tasks.
Pagination at the bottom of the page displays the total record count and current page. The number of records per page is configurable and defaults to 10.
The gear icon in the top toolbar opens personal table settings: row height, columns, and saved widths. The main task list and task list inside a project share one profile. See Table Settings.
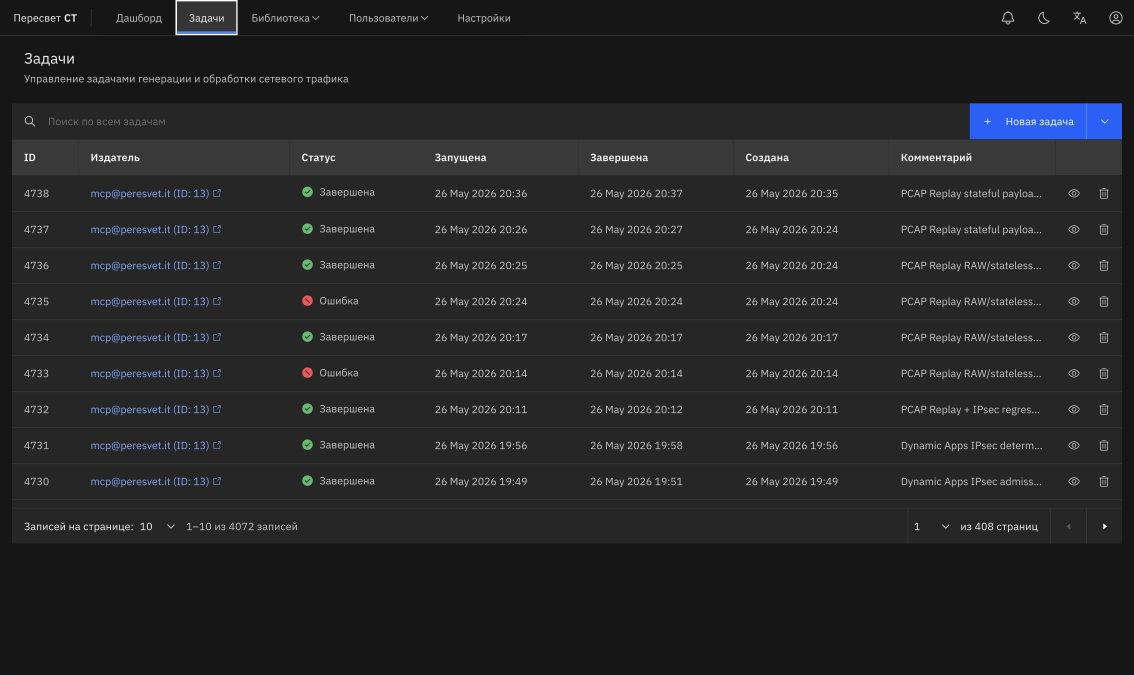
Figure 13 — Task list, search, and quick actions
Projects
A project organizes measurement work around a particular DUT or testing objective. For example, you can create a dedicated project for testing a PT NGFW 1050 and place all related tasks in it: initial runs, repeat measurements with changed parameters, and validation tests. Opening the project presents the entire run history and results in one location.
A project does not replace a task or change its configuration. A task can belong to only one project. Removing a task from a project preserves it in the main Tasks list.
Project List and Search
The Projects section lists projects with these columns:
| Column | Description |
|---|---|
| ID | Unique numeric project identifier |
| Name | Name of the test campaign or another related task set |
| Description | Test objective, DUT, and conditions |
| Creator | User who created the project |
| Tasks | Number of tasks in the project |
| Last Activity | Time of the most recent project task creation, change, start, move, or deletion |
Search All Projects searches by ID, name, description, and creator. Text-field search is case-insensitive and supports partial matches. The view and delete actions are available at the right of each project row.

Figure 14 — Project list, search, and quick actions
Creating a Project
To create a project:
- Open Projects.
- Click New Project.
- Enter a unique project name. A name is required and can contain up to 128 characters.
- Optionally add a description of up to 2,000 characters.
- Click Create. The new project page opens after creation.
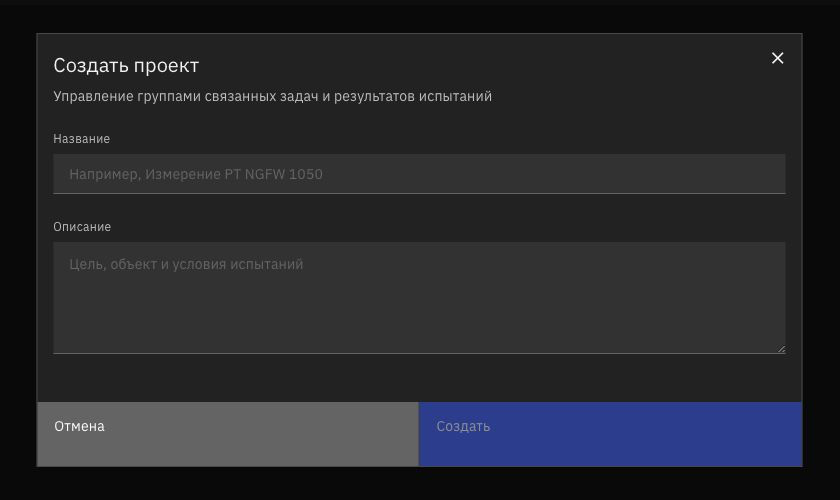
Figure 15 — Project creation form
Project Page
The top of a project page displays its name, description, and metadata:
- Creator — user who created the project;
- Created — project creation date and time;
- Modified — time when the name or description was last changed;
- Last Activity — time of the most recent related task creation, change, start, move, or deletion;
- Tasks — current number of tasks in the project.
Edit the name or description directly in the header: click the field, edit the text, and click outside the editor to save. When the description is empty, an Add Description link is displayed instead.
Below the header is the project's task table. It has the same layout as the main Tasks table but contains only tasks in the current project. Search within the project filters its tasks by ID, publisher, and comment.
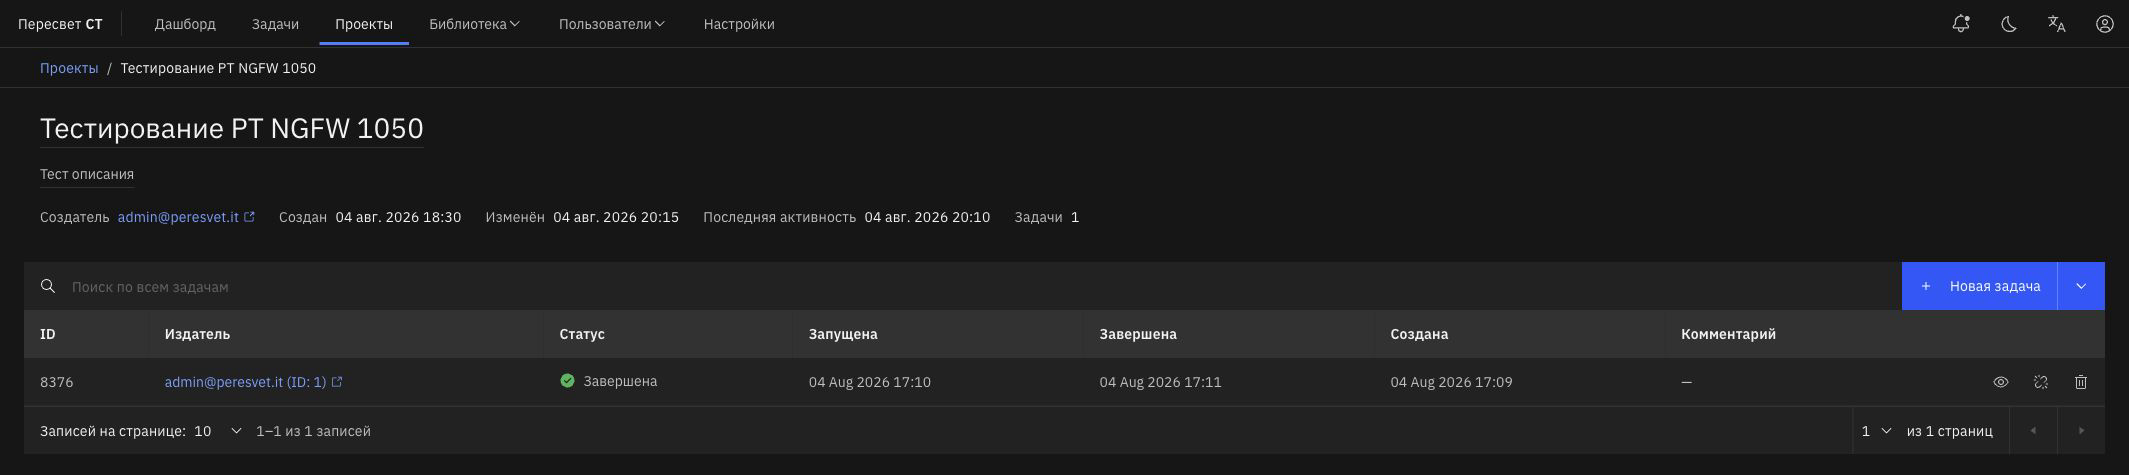
Figure 16 — Project page and related tasks
Creating, Importing, and Managing Project Tasks
The project page provides these actions:
- New Task — opens the new-task builder with the current project already selected;
- arrow to the right of New Task → Import Tasks — creates tasks in the current project from JSON files or
.pa-task-exportarchives; - view (eye icon) — opens the selected task;
- remove from project (broken-link icon) — removes the project association but keeps the task in the main list;
- delete (trash icon) — deletes the task itself from the system after confirmation.
Search All Tasks on the project page searches only that project's tasks, including by ID and comment.
Adding an Existing Task to a Project
To add an existing task to a project or move it from another project:
- Open the task from the main list.
- Click Project in the metadata row.
- Start typing a name to filter the list, and select the required project.
Selecting a new project moves the task from its previous project. Not Selected returns it to the main list without deleting it. For a task in a project, breadcrumbs show the full path: Projects → project name → Task #ID.

Figure 17 — Selecting or changing a project on the task page
Deleting a Project
Only an empty project can be deleted. First remove its tasks to the main list or delete them, then click the trash icon in the project table and confirm. Project deletion is irreversible, but tasks removed from it are preserved.
Task Page
Click the view icon in a task row to open its page. The header displays the task number, such as Task #1915, and current status, such as Completed. Start Task in the upper-right corner starts it again.
The task page contains the main configuration and result tabs:
| Tab | Description |
|---|---|
| Data Plane | Data-plane settings and results: traffic-generation parameters and packet/flow statistics |
| Control Plane | Control-plane settings and results: routing protocols such as BGP, IS-IS, and OSPF |
| Access Groups | Subscriber access settings: IPoE, PPPoE, DHCPv4/DHCPv6, SLAAC, 802.1X, and related protocols |
| Diagram | Visual diagram of the test topology |
| Metrics | Charts and numeric task execution metrics |
| Events | Task execution and protocol state-change events |
| Logs | Task execution log with filtering and search |
Logs Tab
The Logs tab displays the execution log for troubleshooting and test analysis. Its Execution Logs section contains:
- Search Logs — text filter for record contents;
- Agents — drop-down filter for a particular agent;
- Log Level — drop-down filter with three values:
- All Levels — every log record;
- Errors — execution errors only;
- Info — informational messages only.
The upper-right corner of the section contains helper buttons to download log, copy to clipboard, scroll up, and scroll down, as well as an Auto-scroll checkbox that automatically follows the newest record in real time.
If logs have not yet been produced, the interface displays No Logs Yet.
Creating a Task in the Builder
To configure Peresvet ST for traffic generation:
- Connect to the Peresvet ST web interface in a web browser.
- Open Tasks → + New Task.
- Configure the plugins.
To reuse a previously configured scenario, open the arrow menu to the right of New Task and select Create from Template. Saving, selecting, and managing templates is described under Library → Task Templates.
A plugin selects a particular traffic type for transmission or reception.
The task builder is divided into working planes and result sections: Data Plane, Control Plane, Access Groups, Diagram, Metrics, Events, and Logs. Data Plane generates and receives user traffic; Control Plane covers routing and control protocols; Access Plane covers subscriber access and access protocols.
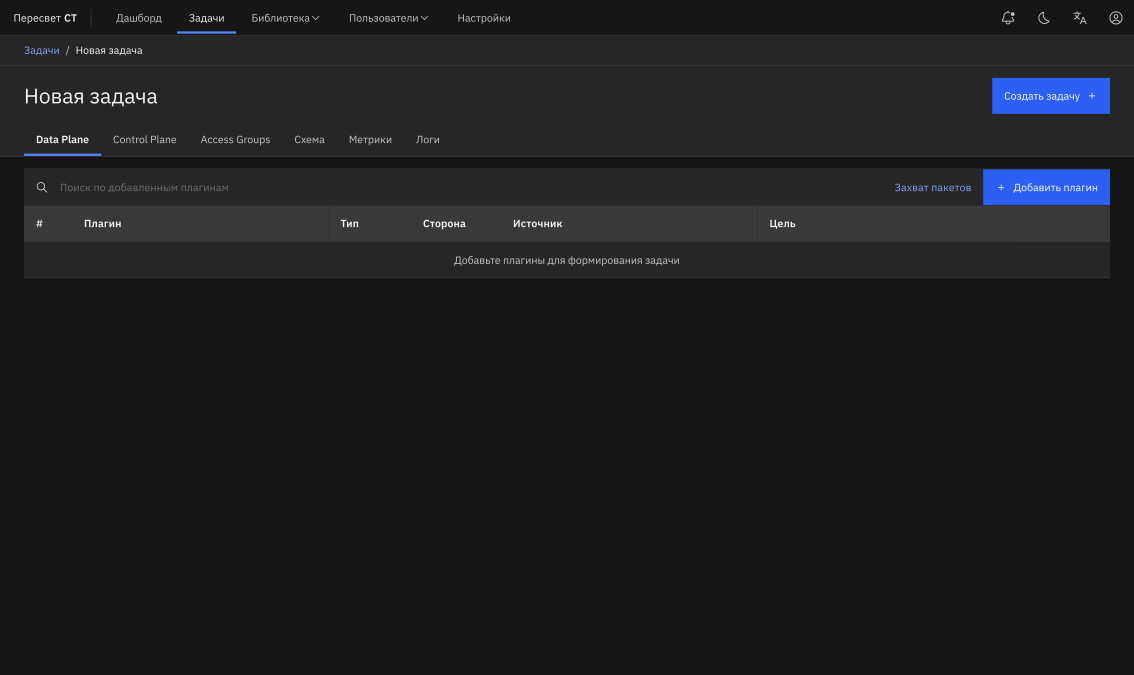
Figure 18 — New task builder
Click Add Plugin to open the plugin catalog. The catalog provides search, categories, and plugin attributes such as client/server side, protocol layer, transport, and operating mode.
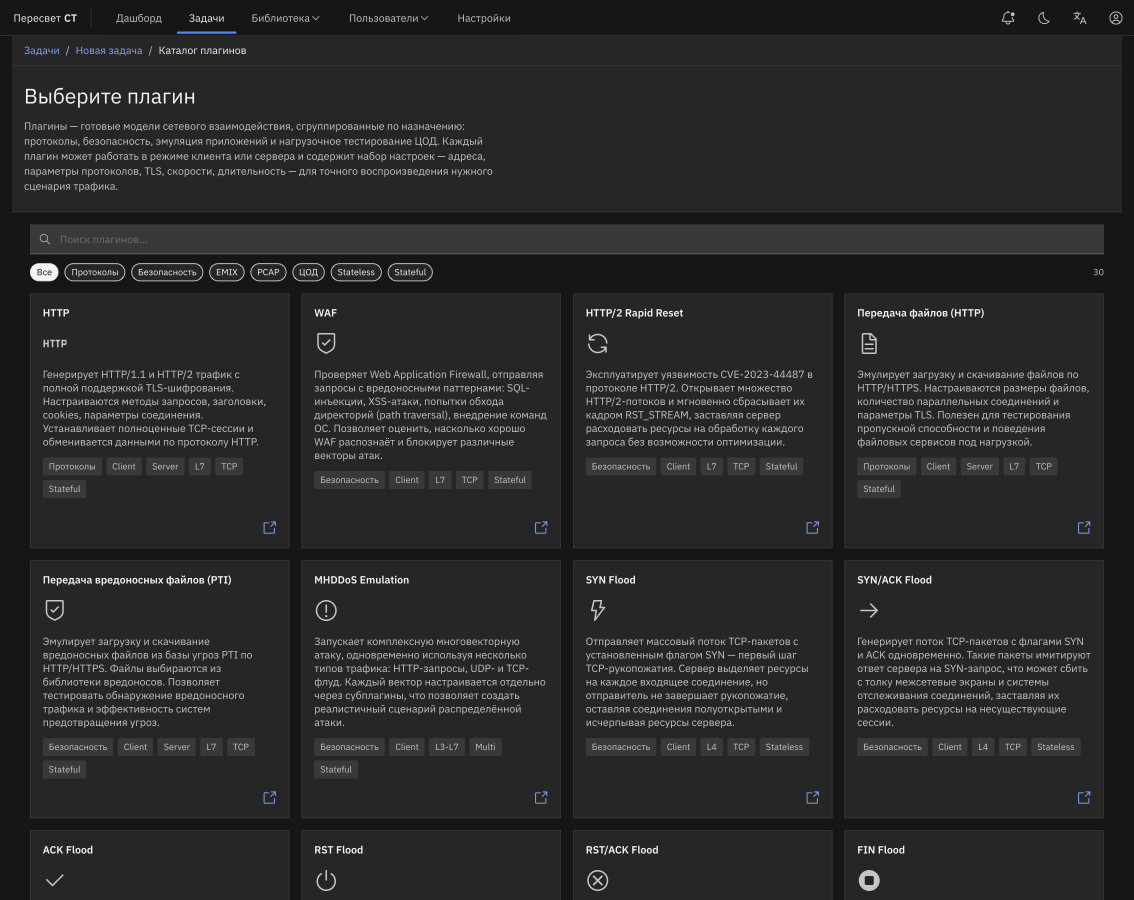
Figure 19 — Plugin catalog
Continue with:
- plugin objects — Library;
- plugin parameters — Data Plane, Control Plane, and Access Plane;
- results and operations — Metrics, Actions, Logs, Task Lifecycle, Traffic Capture, Report Export and Task Import, and Automation.