Library
The Library configures agents, task templates, and the objects used in traffic-generation tasks: networks, MAC addresses, certificates, tunnels, dictionaries, user files, PCAPs, CVEs, malware packages, C2 scenarios, and Dynamic Applications.
Library objects are selected in the task builder. After uploading PCAP, PTI, or user files, run Settings → Synchronization so that agents receive the missing objects.
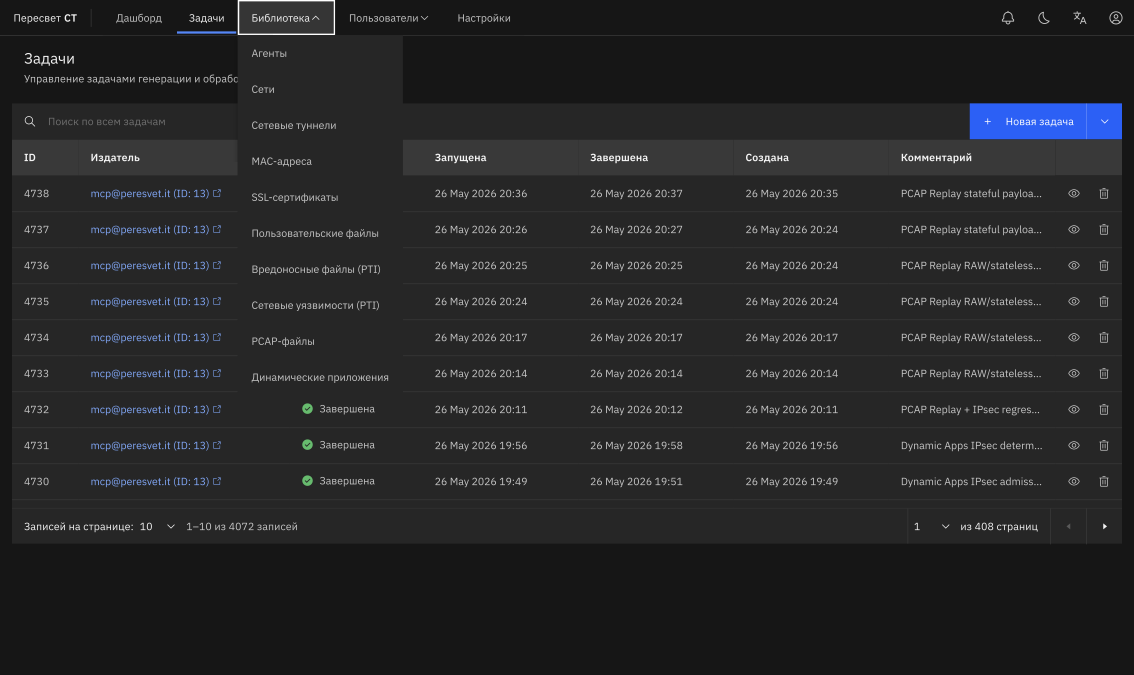
Figure 2 — Library sections
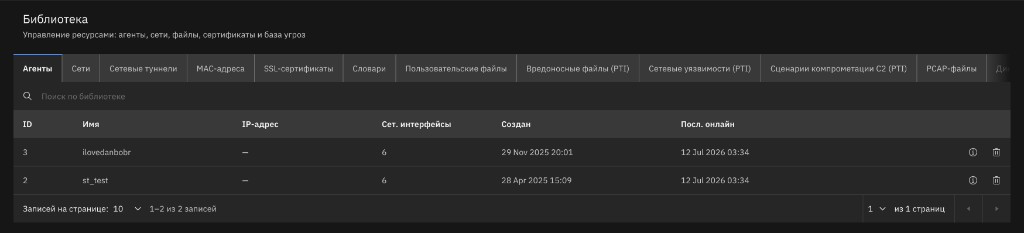
Figure 3 — Library tabs that do not fit on screen
If there are too many tabs to fit across the top, hold the left mouse button on the tab row and drag left or right to scroll to hidden tabs.
Agents
An agent is a hardware-software component that generates traffic with the configured parameters. It can be deployed on a physical server or virtual machine.
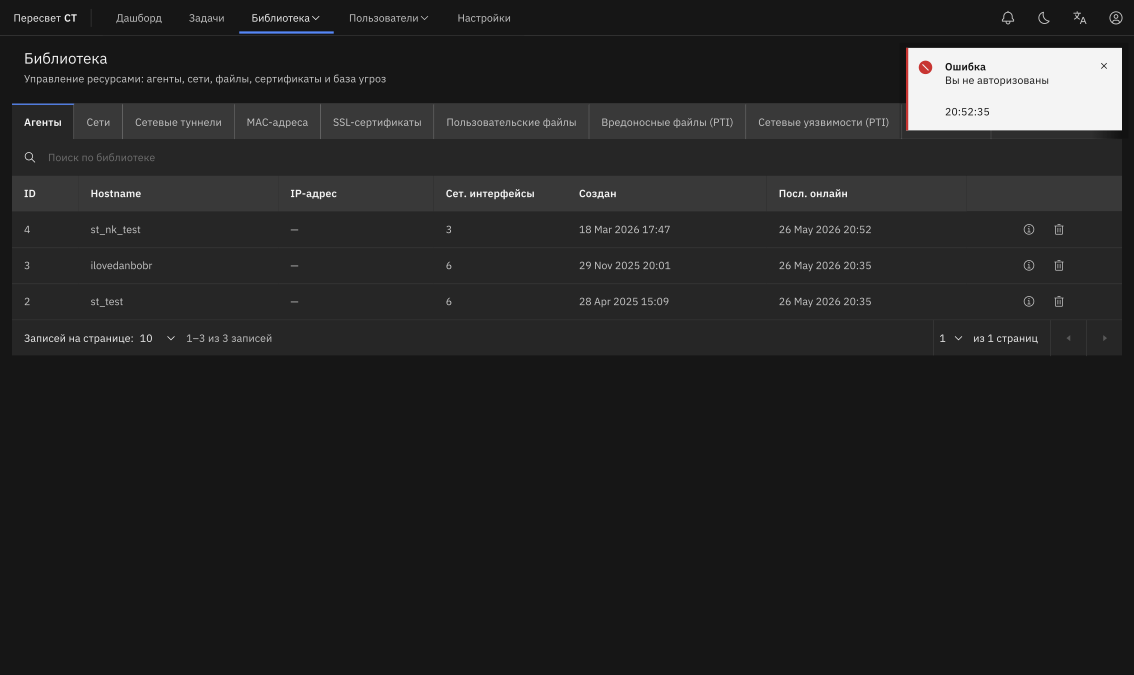
Figure 4 — Agents section in the Library
Adding an Agent License
To add an agent license:
- Open Library → Agents.
- Find the agent, click its
 metadata button, and select Details.
 - The agent metadata dialog opens (Figure 5). Copy the agent HWID.
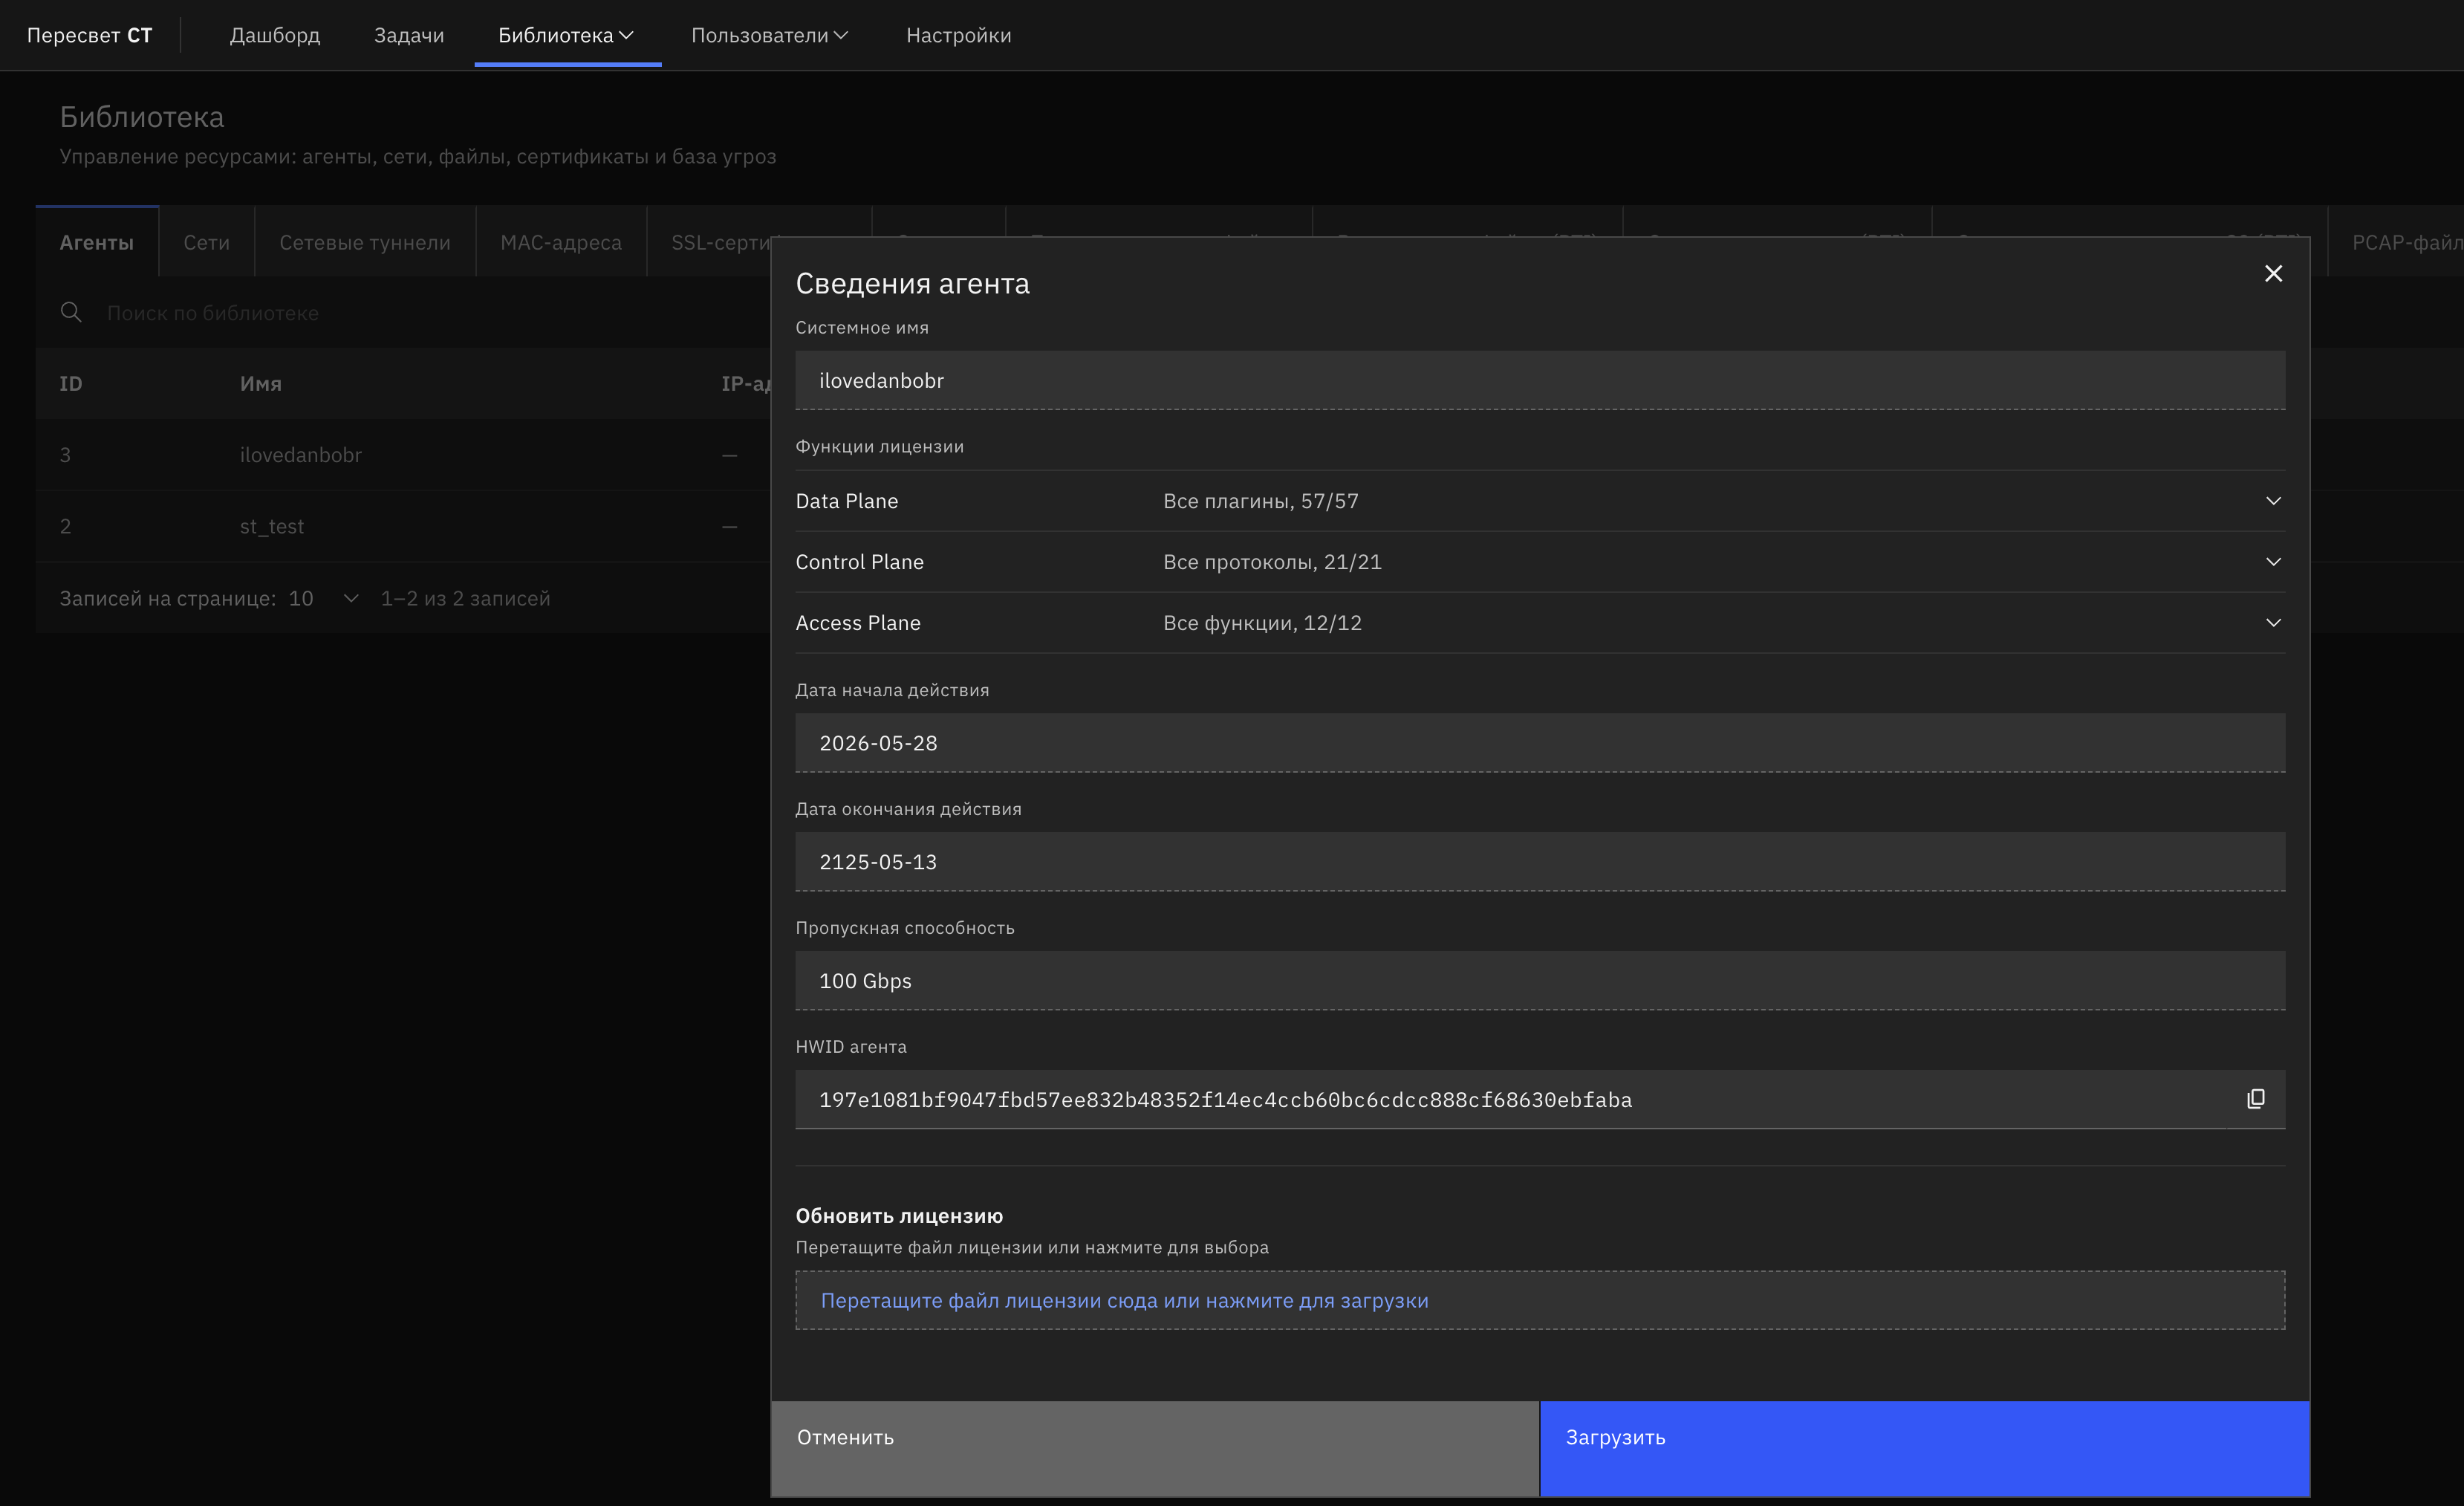
Figure 5 — Agent Details and license upload
- Email the HWID, legal-entity name, and contact details to support@peresvet.it.
- The license file is sent in reply.
- Click the agent metadata button again and select Upload License.
- Click Browse Files and select the license file, or drag it into the dashed area.
- After uploading the file to the controller, click Upload to Agent.
- Close and reopen Details, then verify the licensed products, start/end dates, and throughput.
Task Templates
A task template is a saved configuration snapshot from which a new task can be prepared without reconfiguring every section. Templates are shared: any authorized user can view and use them and can edit their names/descriptions or delete them.
A template stores:
- Data Plane plugins and parameters;
- selected agents and network interfaces;
- networks and other library object references;
- Control Plane and Access Plane settings;
- traffic capture settings;
- the task comment.
The project, status, execution results, events, logs, and run history are not included. A saved template is independent of subsequent changes to the source task; the source can be edited or deleted without changing the snapshot.
Library objects are not duplicated with a template. The snapshot stores references to existing networks, files, certificates, tunnels, and other objects. Before saving a new task, make sure that all required objects remain available. To move a task to another installation, use Export Task with Dependencies.
Saving a Task as a Template
Only an already saved task can be made into a template, regardless of its current status:
- Open the task.
- Click Parameters (⋮).
- Under Duplicate Task, select Save as Template.
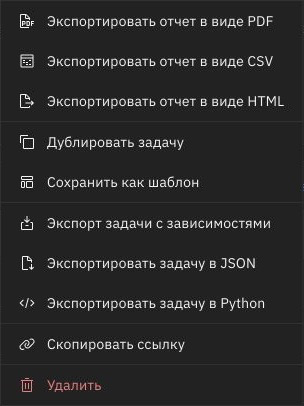
Figure 5.1 — Saving a task configuration as a template
In the dialog, specify:
- Name — required, up to 128 characters;
- Description — optional, up to 2,000 characters.
Duplicate names are allowed. Click Save after entering the required name.
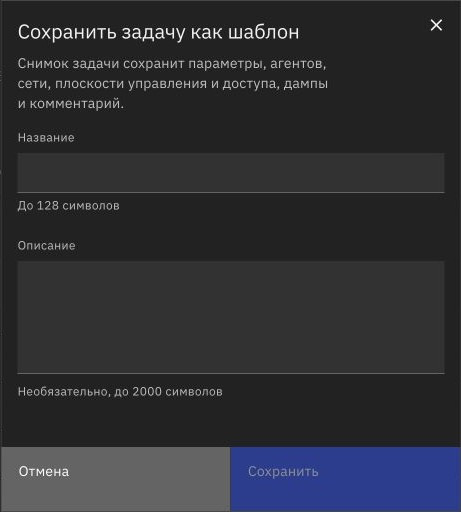
Figure 5.2 — Template name and description
A template cannot be created directly from an unsaved builder. Save the task normally first, then open it and follow the steps above.
Managing Templates
Open Library → Task Templates. This tab is between Agents and Networks.
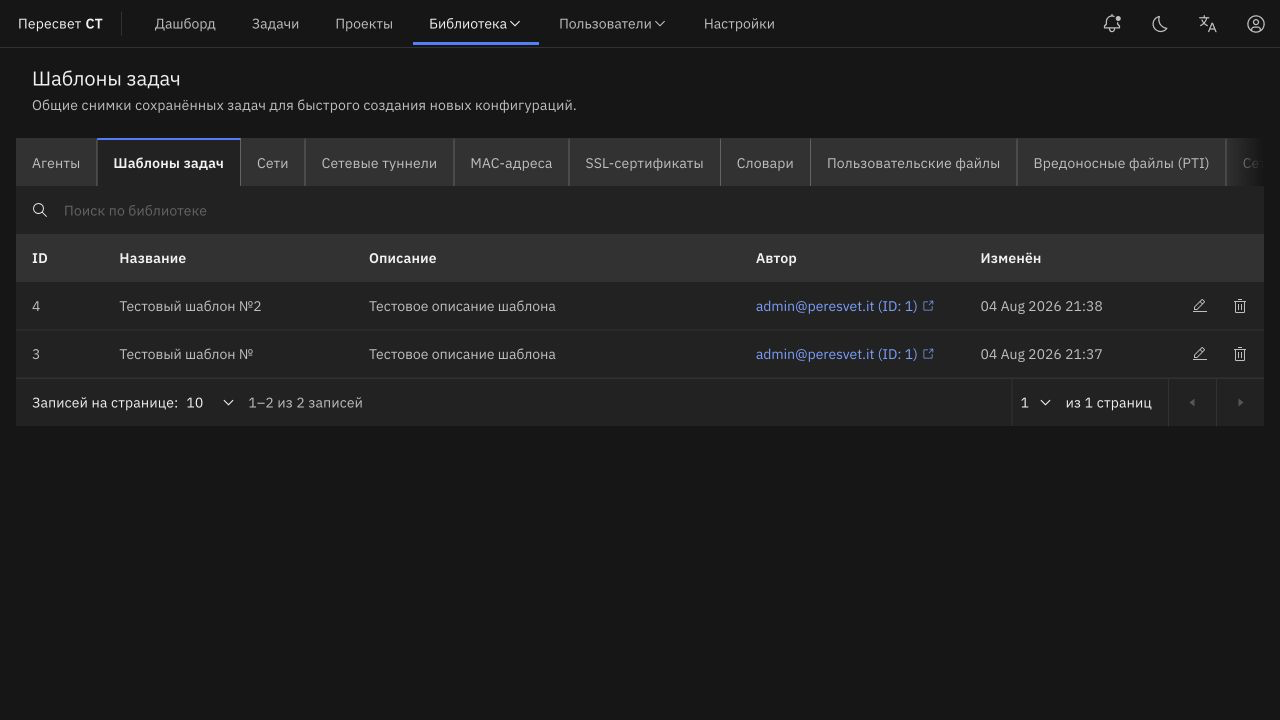
Figure 5.3 — Task templates in the Library
The table displays ID, name, description, author, and modification date and supports search, sorting, and pagination. Row actions include:
- Edit — changes only the name and description;
- Delete — removes the template from the Library and selection dialog.
The saved snapshot itself cannot be edited. For another configuration, create and save a task with the required parameters and then save it as a new template. The tab has no separate create button.
Creating a New Task from a Template
- Open Tasks.
- Click the arrow to the right of New Task.
- Select Create from Template.
- If required, search by template name, description, or author.
- Select one template with the radio button. Create becomes available.
- Click Create.
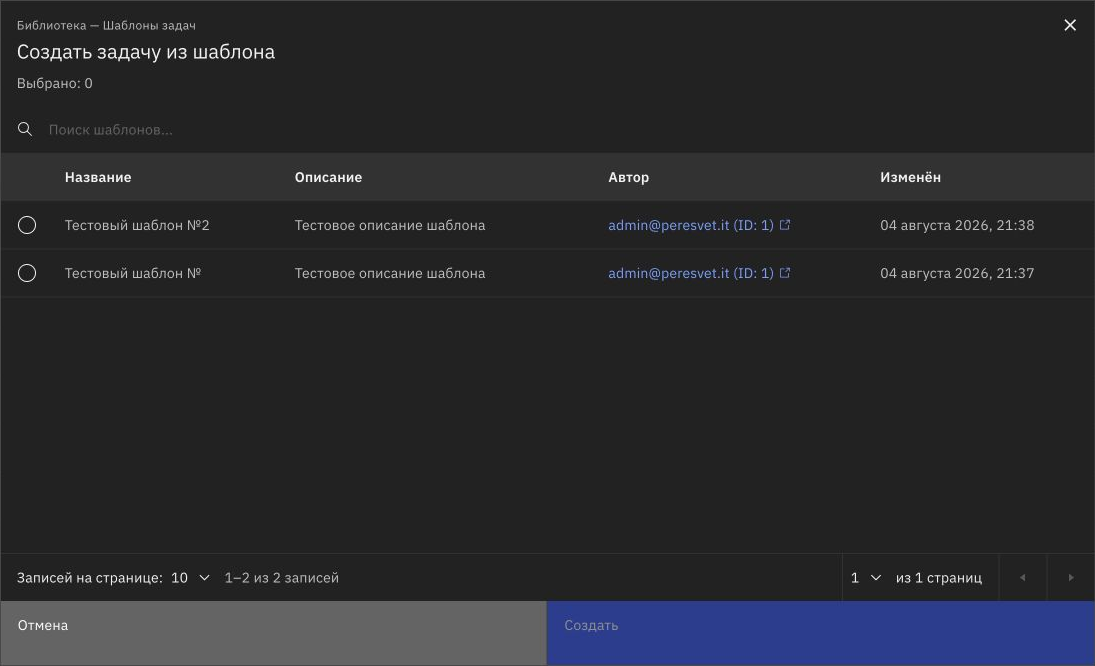
Figure 5.4 — Selecting a template for a new task
The builder opens with the title New Task. The template configuration is loaded into the form, but no new task record exists yet: it has no ID or status. Review the plugins, agents, interfaces, networks, Control Plane, Access Plane, captures, and comment, then save with the normal builder button. Only then does the system create a new task and assign an ID.
The source task's project is not transferred. Select a project separately if required. If a referenced library object was changed or deleted after template creation, the builder requires the binding to be corrected before saving.
Networks
This section creates objects used in traffic-generation profiles. Network objects have two roles:
- Sender — used as the sender by traffic-generation plugins;
- Receiver — used as the receiver by traffic-generation plugins.
Sender objects have two modes:
- pattern spoofing disabled — used in stateful plugins;
- pattern spoofing enabled — used in stateless plugins.
MAC Policy
For sender networks, configure how IP addresses map to MAC addresses on the agent port.
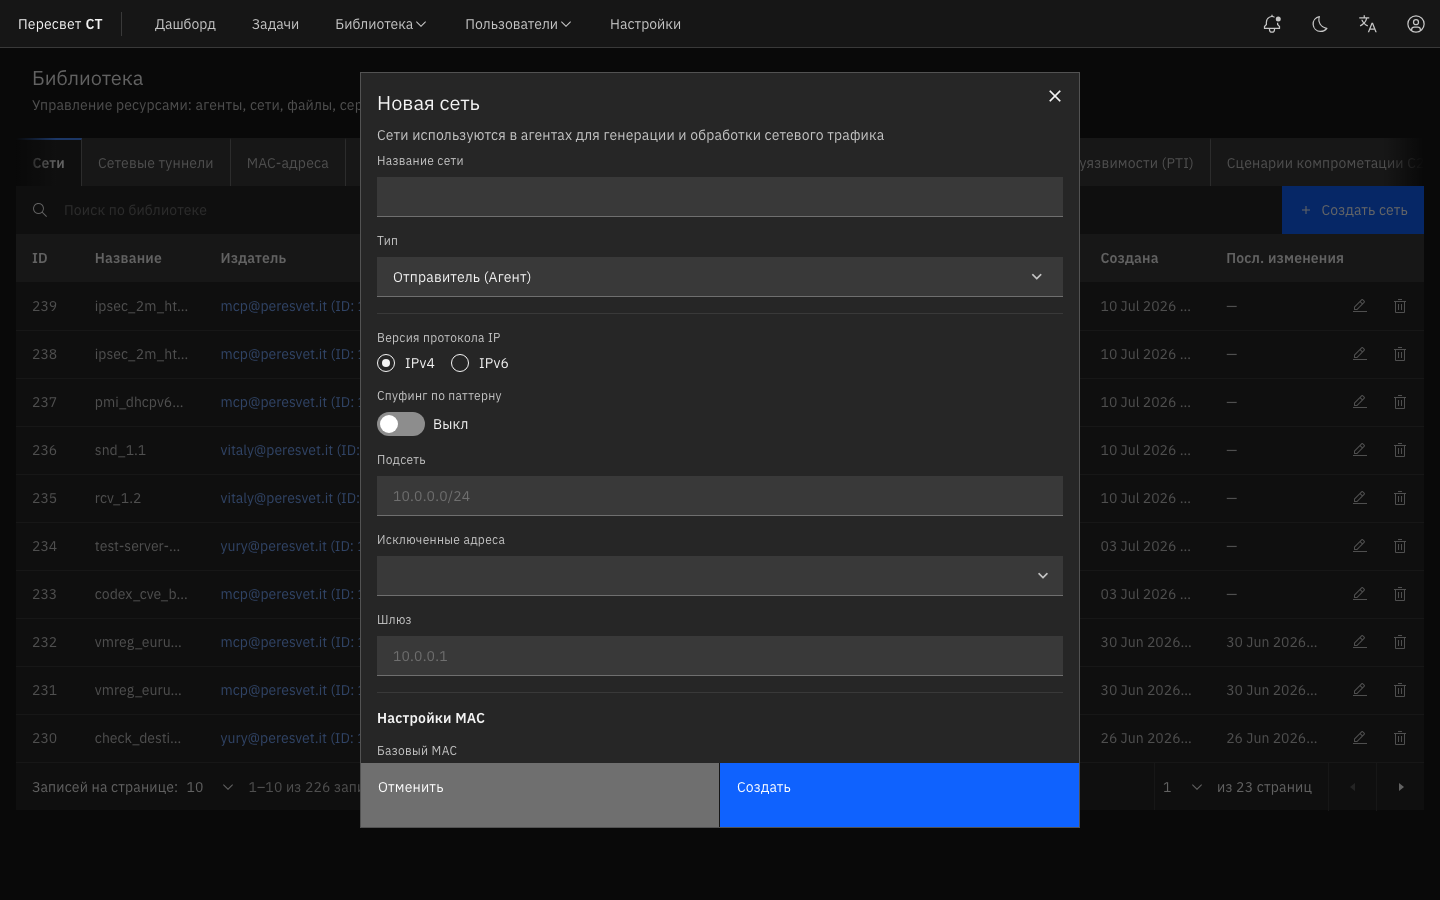
Figure 6 — MAC Settings when creating or editing a network
| Name | Description | Value |
|---|---|---|
| Base MAC | Automatically use the port MAC, or choose a custom MAC from the library | Select a mode |
| IP distribution | Single MAC / Increment / Decrement | Generation mode |
| Library MAC | Base address in custom mode | Object from the MAC Addresses tab |
| Step | Increment/decrement step | ≥ 1 |
| Configure IP-to-MAC Mapping | Preview IP→MAC mappings and override individual entries | Available after selecting a subnet |
Exact MAC addresses are calculated after the agent and network interface are selected in a task. The preview displays a limited page of mappings and allows an override to be reset to the generated value.
Adding a Sender Network for Stateful Plugins
- Open Library → Networks.
- Click + Create Network (Figure 7).
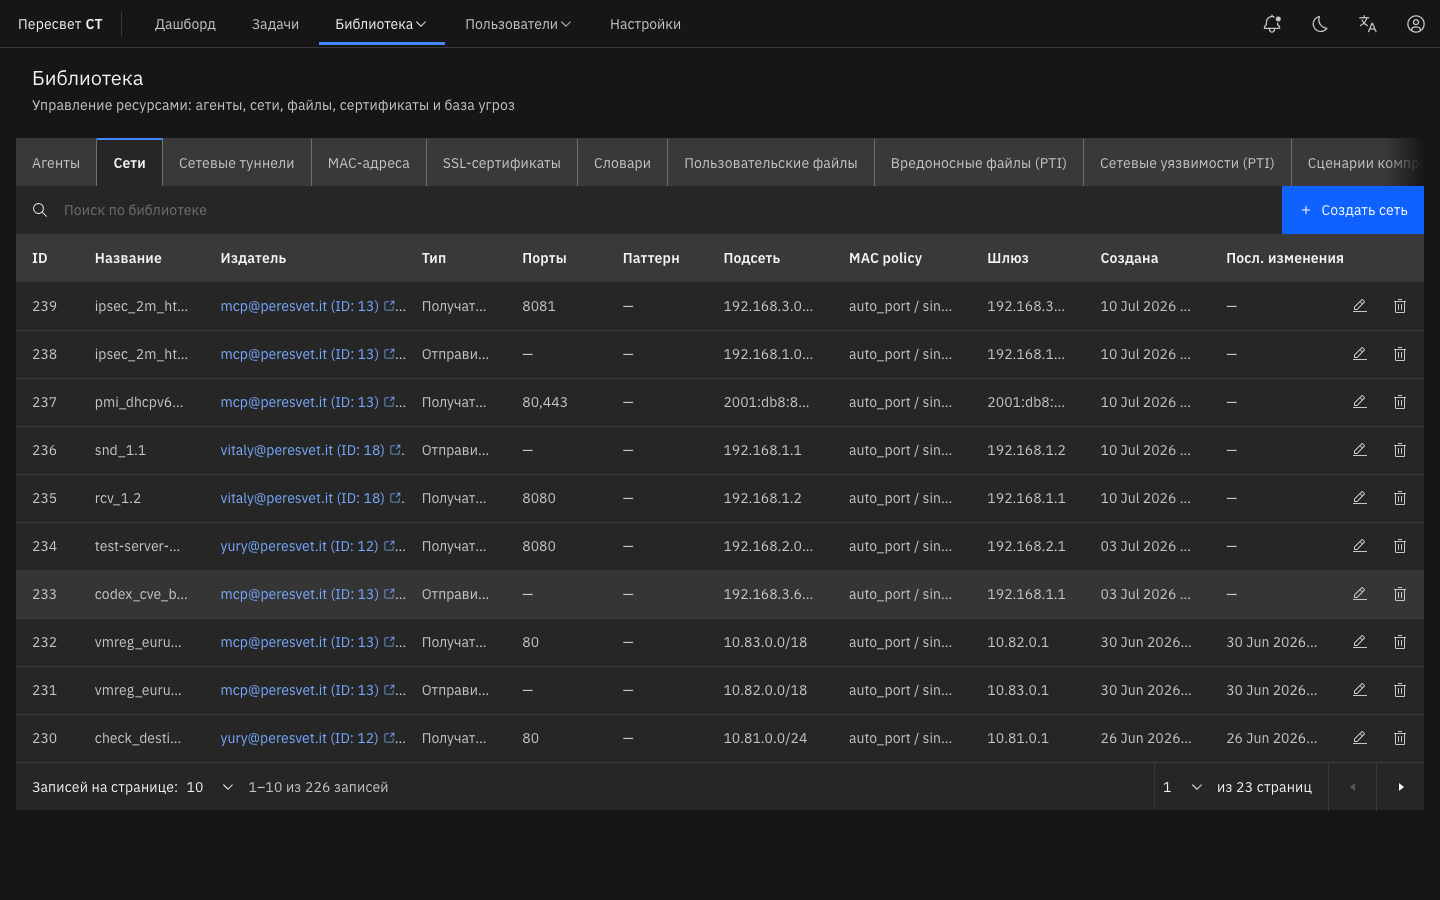
Figure 7 — Networks tab
- Complete the fields in Table 1.
Table 1 — Sender Network Fields for a Stateful Plugin
| Name | Description | Value |
|---|---|---|
| Network name | Object name shown in plugin settings | Enter a network name |
| Network type | Sender objects are used as traffic senders; Receiver objects are used as traffic receivers | Sender |
| Pattern spoofing | Generate IP addresses from the pattern in the next field | Disabled; if enabled, examples are 10.10.10.{10-200} and IPv6 2001:db8:10:10::{10-200} |
| Subnet | IP addresses used as packet senders | IPv4: 10.10.10.0/24; IPv6: 2001:db8:10:10::/64 |
| Excluded addresses | Addresses in the subnet that must not be used; select addresses already used by other devices to avoid overwriting ARP tables | IPv4: 10.10.10.1, 10.10.10.2, 10.10.10.100; IPv6: 2001:db8:10:10::1, 2001:db8:10:10::2, 2001:db8:10:10::100 |
| Gateway | Device that connects the sender subnet to the receiver network selected in the plugin | IPv4: 10.10.10.1; IPv6: 2001:db8:10:10::1 |
- Click Apply to create the network.
Adding a Sender Network for Stateless Plugins
- Open Library → Networks.
- Click + Create Network (Figure 7).
- Complete the fields in Table 2.
Table 2 — Sender Network Fields for a Stateless Plugin
| Name | Description | Value |
|---|---|---|
| Network name | Object name shown in plugin settings | Enter a network name |
| Network type | Sender objects are used as traffic senders; Receiver objects are used as traffic receivers | Sender |
| Pattern spoofing | Generate IP addresses from the pattern in the next field | Enabled |
| Pattern | Pattern used to generate packet source addresses | Use X.*.*.*, where X is always 0–255. Each remaining octet can be a number from 0–255 or * for any value. Examples: 192.*.*.*, 10.0.*.*, or the specific address 172.16.5.100 |
| Server address | IP address through which the agent exchanges information about its IP and MAC addresses | Specify an IP address, for example 10.10.10.2 |
| Gateway | Device that connects this subnet to the receiver network selected in the plugin | Specify an IP address, for example 10.10.10.1 |
- Click Apply.
Adding a Receiver Network
- Open Library → Networks.
- Click + Create Network (Figure 7).
- Complete the fields in Table 3.
Table 3 — Receiver Network Fields
| Name | Description | Value |
|---|---|---|
| Network name | Object name shown in plugin settings | Enter a network name |
| Network type | Sender objects are used as traffic senders; Receiver objects are used as traffic receivers | Receiver |
| Subnet | IP addresses used as packet receivers | Enter CIDR notation, for example 10.10.10.10 or 10.10.10.0/24 |
| Excluded addresses | Addresses from the subnet that must not be used | Select addresses from the list |
| Ports | Network ports through which this network or connection exchanges data | Enter numeric ports, for example 80 or 80,81,82 |
- Click Apply.
MAC Addresses
This section creates MAC objects used in traffic-generation profiles. They have two roles: Sender and Receiver.
Adding a Sender MAC Address
- Open Library → MAC Addresses.
- Click + Create MAC Address (Figure 8).
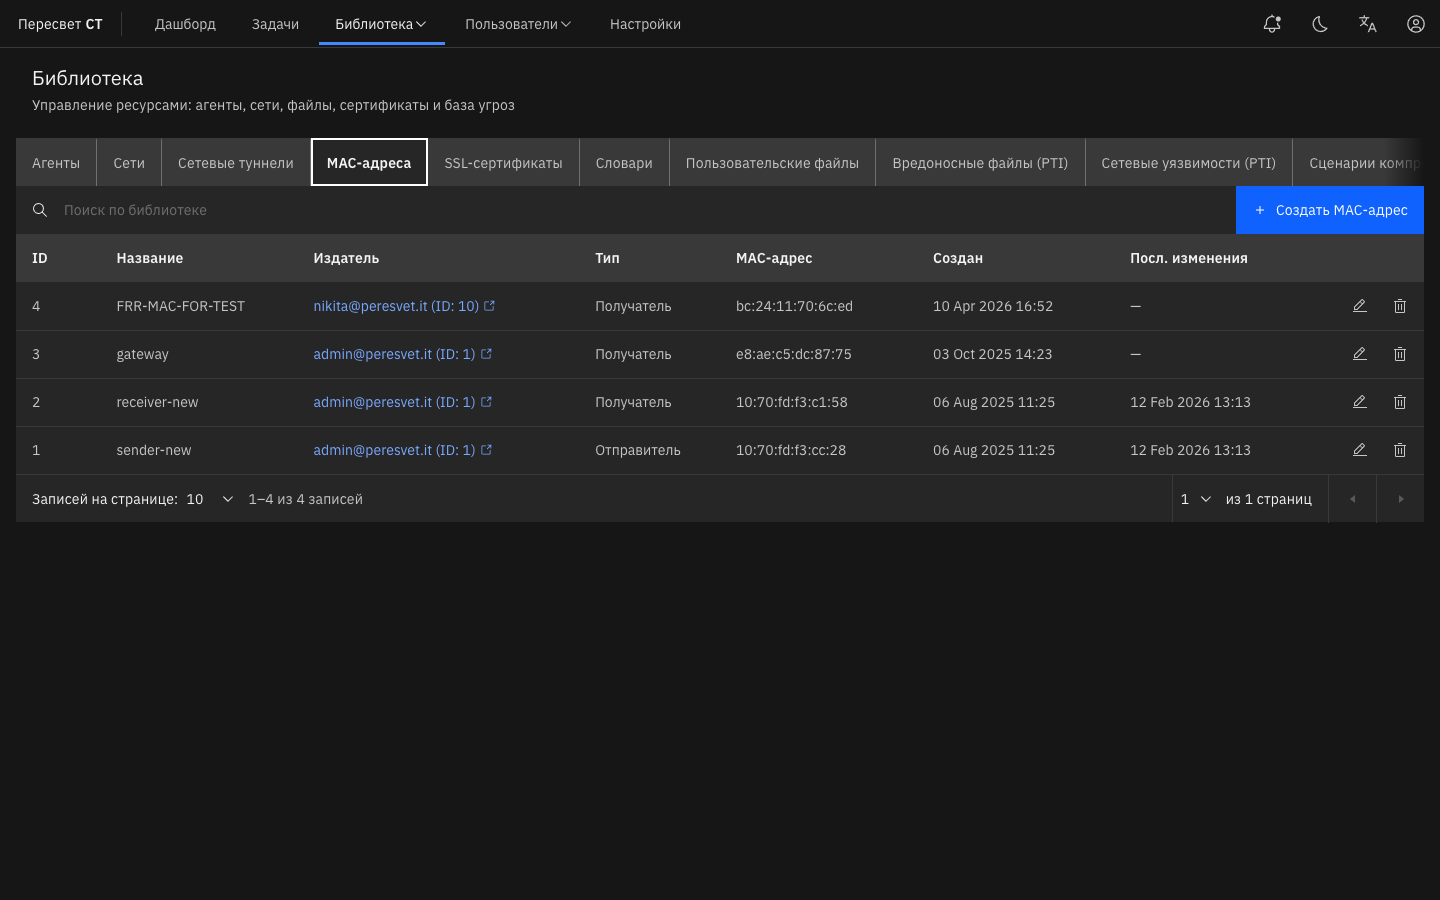
Figure 8 — MAC Addresses tab
- Complete the fields in Table 4.
Table 4 — Sender MAC Address Fields
| Name | Description | Value |
|---|---|---|
| MAC address name | Object name shown in plugin settings | Enter a name |
| MAC address type | Sender or Receiver role in traffic-generation plugins | Sender |
| MAC address | MAC address used as the packet sender | Enter a standard MAC address, for example AB:CD:EF:12:34:56 |
Adding a Receiver MAC Address
- Open Library → MAC Addresses.
- Click + Create MAC Address (Figure 8).
- Complete the fields in Table 5.
Table 5 — Receiver MAC Address Fields
| Name | Description | Value |
|---|---|---|
| MAC address name | Object name shown in plugin settings | Enter a name |
| MAC address type | Sender or Receiver role in traffic-generation plugins | Receiver |
| MAC address | MAC address used as the packet receiver | Enter a standard MAC address, for example AB:CD:EF:12:34:56 |
SSL Certificates
To create an SSL certificate object:
- Open Library → SSL Certificates.
- Click + Add Certificate (Figure 9).
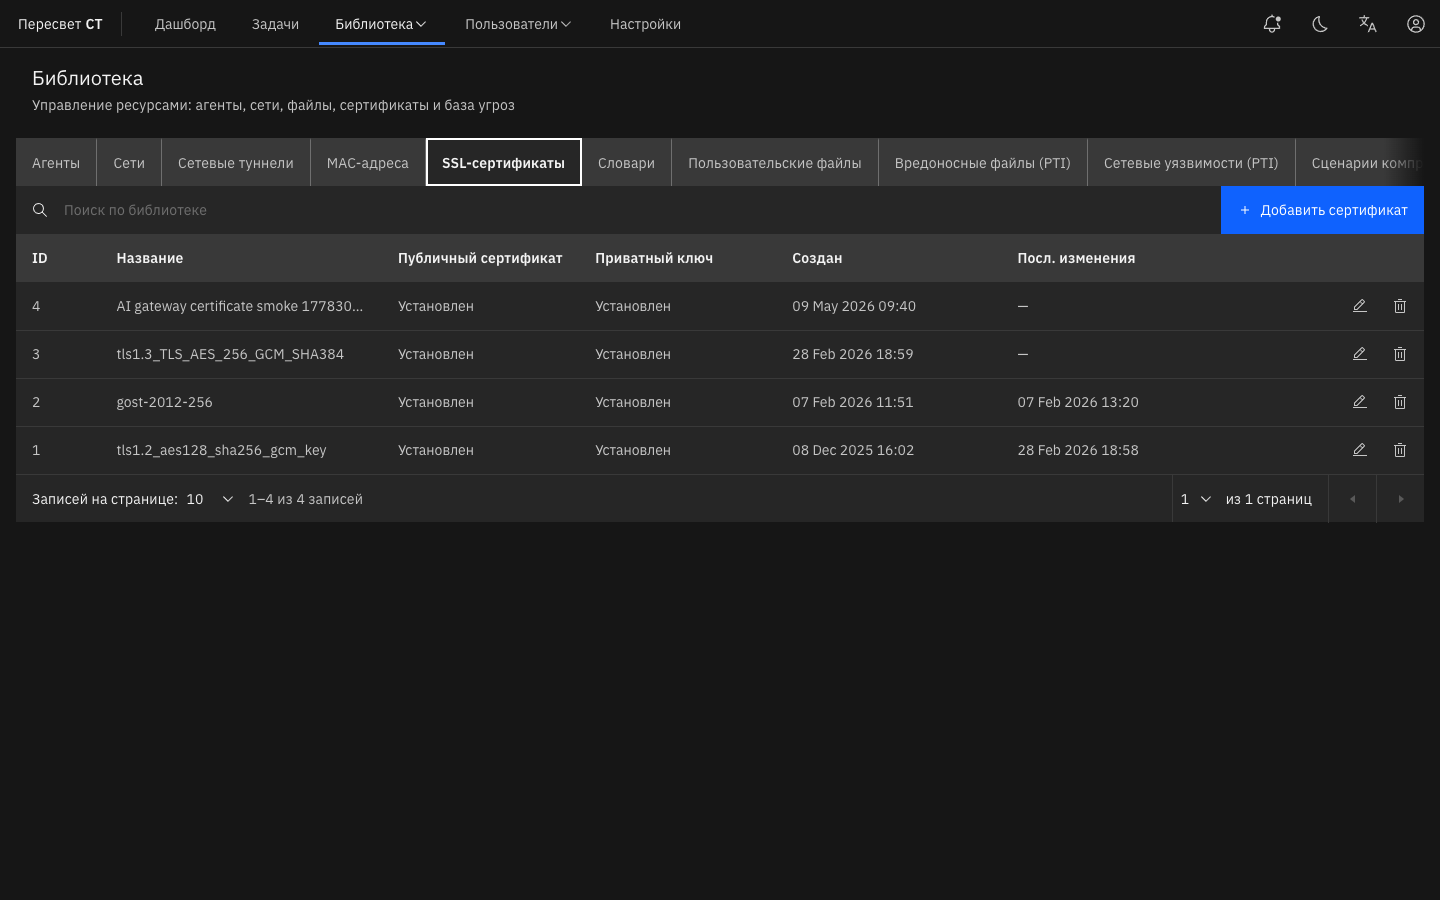
Figure 9 — SSL Certificates tab
- Complete the fields in Table 6.
Table 6 — SSL Certificate Fields
| Name | Description | Value |
|---|---|---|
| SSL certificate name | Object name shown in plugin settings | Enter a name |
| Public key | Public part of the key pair, used to encrypt data and verify digital signatures | Enter the certificate content |
| Private key | Secret part of the key pair, used to decrypt data and create digital signatures | Enter the corresponding private key |
Network Tunnels
Library → Network Tunnels creates reusable encapsulation profiles for VLAN, VXLAN, GRE, IP-IP, MPLS, and IPsec. Select a tunnel from the plugin's Network Tunnels parameter group. Layer details and workflow are described under Access Plane → Network Tunnels.
Dictionaries
Library → Dictionaries creates reusable value sets. A dictionary can be selected in builder fields that display a dictionary-selection icon. In the current version, dictionaries are supported for HTTP path, User-Agent, query parameters, headers, request body, and server-side HTTP response headers and body.
A dictionary avoids entering variable values manually in every task field. For example, create one User-Agent list, request-ID sequence, or username/password table and use it in several HTTP scenarios.
Table 7 — Dictionary Types
| Dictionary type | Purpose | Example |
|---|---|---|
| Enumeration | Explicit string values selected randomly or round-robin. A prefix and suffix can be added to every value | Values Request-ID, Trace-ID; prefix X-E2E-; results X-E2E-Request-ID, X-E2E-Trace-ID |
| Number range | Numbers generated from a range with a configured step; supports prefix, suffix, and zero-padding | id-001, id-002, id-003 |
| Sequence | Deterministic increasing or decreasing sequence with a configured step; can repeat | session-100, session-101, session-102 |
| Table | Rows with several columns, used when several HTTP fields must receive values from the same row | Columns login, password, token; one request receives a matching triplet |
When creating a dictionary, specify its name, type, selection mode, and values. For a table, define columns first and then add rows. Use a name clear to task-builder users, such as HTTP User-Agent, HTTP Login Data, or Request ID Sequence.
Select a dictionary through the icon next to a supported HTTP field. The field becomes read-only and displays the selected dictionary name. To enter ordinary text again, use the dictionary reset action beside the field.
Value-selection rules:
- when one dictionary is used several times within one HTTP request, every occurrence uses the same selected value;
- different dictionaries in one request are selected independently;
- several columns from one table dictionary come from the same row, so username, password, and token are not mixed between rows;
- a new value is selected for each HTTP request or response;
- if a non-repeating sequence is exhausted, the task must not start with an invalid configuration.
Current rotation behavior:
- rotation occurs when the HTTP request or response is built;
- Round Robin traverses dictionary values in order and then returns to the beginning;
- Random selects randomly, so repeats are possible even with few values;
- several different dictionaries in one request do not form a Cartesian product of every combination;
- parallel worker threads have independent rotation counters, so a PCAP can contain identical consecutive values, especially with few sessions or requests.
For three Round Robin dictionaries in one request:
| Dictionary | Values |
|---|---|
User-Agent | UA-01, UA-02, UA-03 |
session_id | seq-001, seq-002, seq-003 |
login | alice, bob, carol |
Within one worker thread, rotation looks like this:
| HTTP request | User-Agent | session_id | login |
|---|---|---|---|
| 1 | UA-01 | seq-001 | alice |
| 2 | UA-02 | seq-002 | bob |
| 3 | UA-03 | seq-003 | carol |
| 4 | UA-01 | seq-001 | alice |
This is not a full combinatorial sequence such as UA-01 + seq-001 + alice, then UA-01 + seq-001 + bob, and then UA-01 + seq-001 + carol. Each dictionary advances independently within its rotation, and the system does not guarantee that every new TCP session changes at least one parameter.
Table 8 — HTTP Dictionary Examples
| HTTP field | Suitable dictionary | Resulting traffic |
|---|---|---|
| User-Agent | Enumeration with several User-Agent strings | One User-Agent is selected per request |
| Path | Sequence with prefix /api/user/ | /api/user/1, /api/user/2, /api/user/3 |
| Query parameter | Number range with prefix request- | request-1000, request-1001 |
| Header | Enumeration with prefix X-E2E- | X-E2E-Request-ID, X-E2E-Trace-ID |
| Request body | Table dictionary with a payload column | The selected row's value is inserted into the body |
| Username and password | Table with login and password columns | Both values in one request come from one row |
When a field uses a dictionary, the dictionary forms its entire final value. Put static text around the value in the dictionary prefix/suffix or directly in table cells. Do not use dictionaries to store large static request fragments; leave those fields as ordinary text.
User Files
Library → User Files uploads files selected by the File Transfer (HTTP) plugin.
Table 9 — User File Fields
| Name | Description | Value |
|---|---|---|
| File | Uploaded object | Select a local file |
| Name | Human-readable library object name | Enter manually or use the file name |
| Description | File purpose | Identify the scenario that uses the file |
After uploading, wait for agent synchronization. A file-transfer task may fail to start if the file has not reached the agent.
Malware Files (PTI)
Library → Malware Files (PTI) stores imported malware packages for the Malware File Transfer (HTTP) plugin.
End-to-end workflow:
- Upload a
.papackage by drag-and-drop, or use Upload from Direct Link with an HTTP/HTTPS URL to a.pa; the server downloads and imports it. - If required, set storage limit (GB) under Settings → Malware Package (PTI).
- Click Settings → Synchronization → Synchronize Agents so that agents download missing files.
- In a task, add plugin 41 (client and, for two-arm operation, server) and click Select Files.
The interface also provides import history, tag/metadata filtering, and active-import cancellation. Use these files only in an isolated test environment.
C2 Compromise Scenarios (PTI)
Library → C2 Compromise Scenarios (PTI) contains campaigns for the Compromised Host plugin. Each campaign describes the threat family, IOCs (domains/IPs), protocols, scenario and step counts, payload-stage/external-target attributes, and MITRE ATT&CK data when applicable.
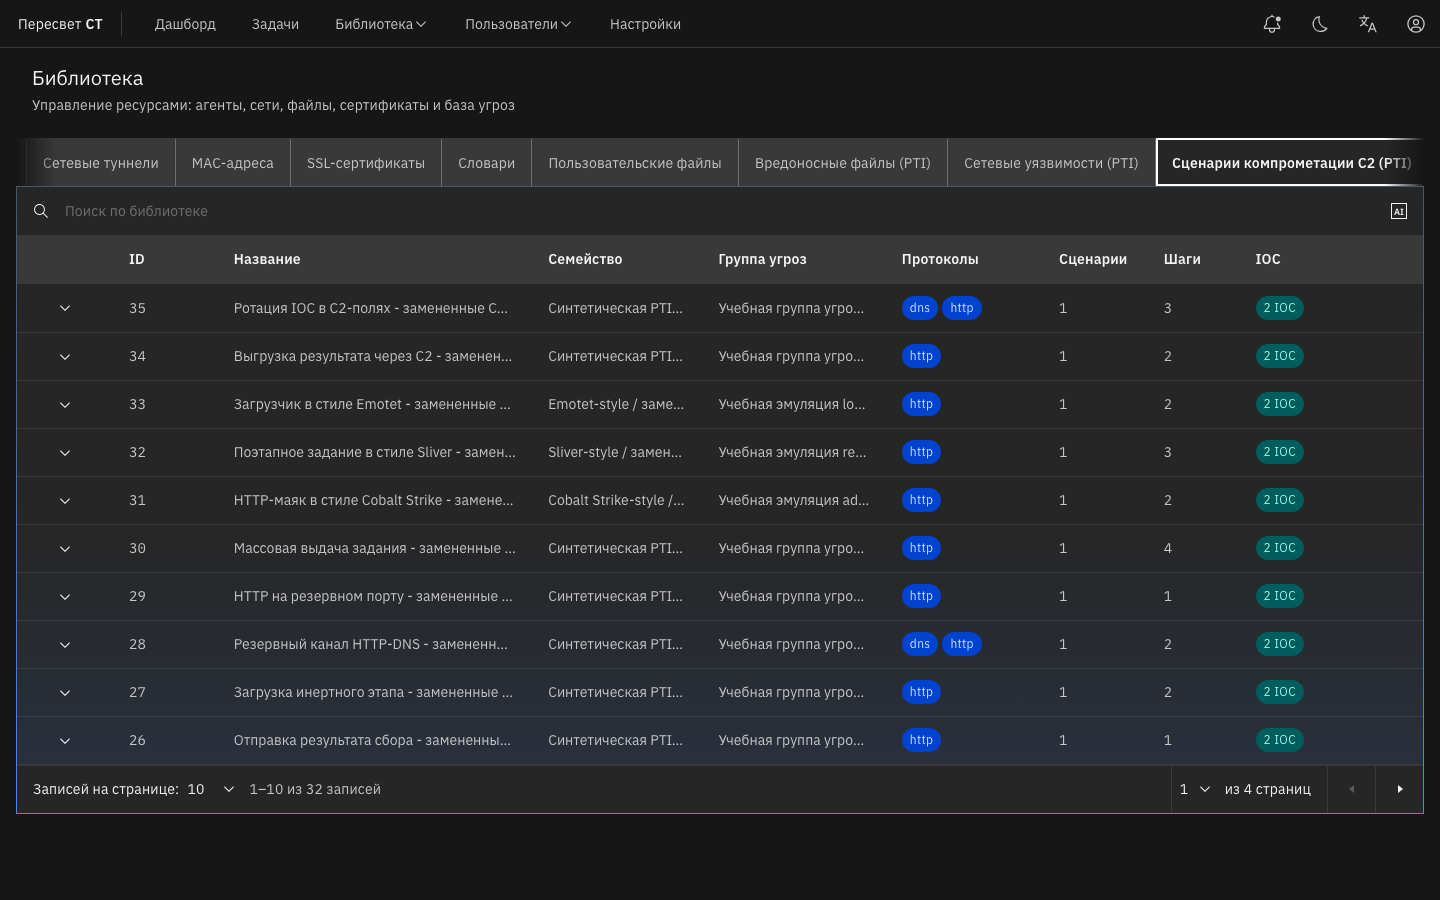
Figure 10 — C2 compromise scenario library (PTI)
| Column | Purpose |
|---|---|
| ID / Name | Campaign identifier and name |
| Family / Threat Group | Classification |
| Protocols | HTTP, DNS, and other artifacts |
| Scenarios / Steps | Chain size |
| IOC | IOC count; the details card lists domains and IP addresses |
Campaigns are supplied in PTI packages. After uploading, run Settings → Synchronization so agents download missing files. Select campaigns in Compromised Host. Empty HTTP Host, DNS, URI, or body fields use package IOCs. Plugin parameters are described under Compromised Host.
Network Vulnerabilities (PTI)
Library → Network Vulnerabilities (PTI) contains CVE scenarios for the Network Vulnerabilities (CVE) plugin.
Table 10 — Main CVE Card Fields
| Name | Description |
|---|---|
| CVE ID | Vulnerability identifier |
| Product and version | Software product to which the scenario applies |
| Protocol | Protocol or protocol group used for replay |
| CVSS | Severity score |
| Year | CVE publication year |
| Description | Short scenario description |
| Replay variants | Available traffic variants for one CVE |
PCAP Files
Library → PCAP Files uploads traffic captures used in PCAP Replay and Dynamic Applications.
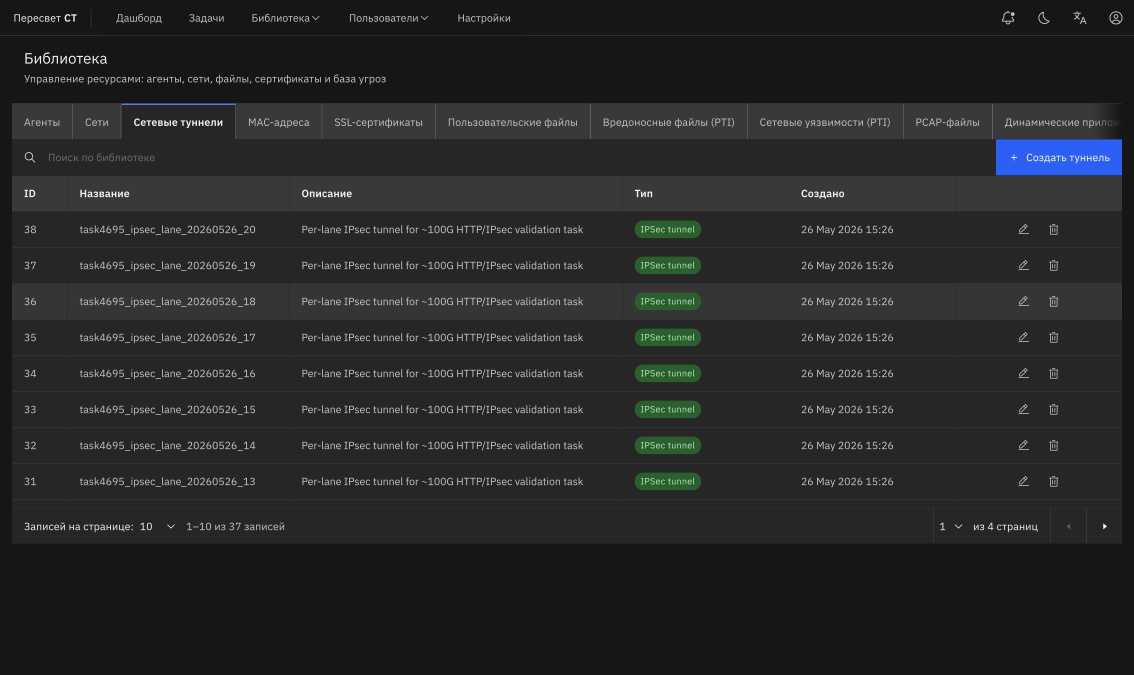
Figure 11 — PCAP file library
After upload, the system analyzes the file and identifies sessions. Before use, make sure that the required TCP/UDP sessions, correct client-server direction, and expected protocols are present.
Dynamic Applications
Library → Dynamic Applications contains user applications created from PCAP files.
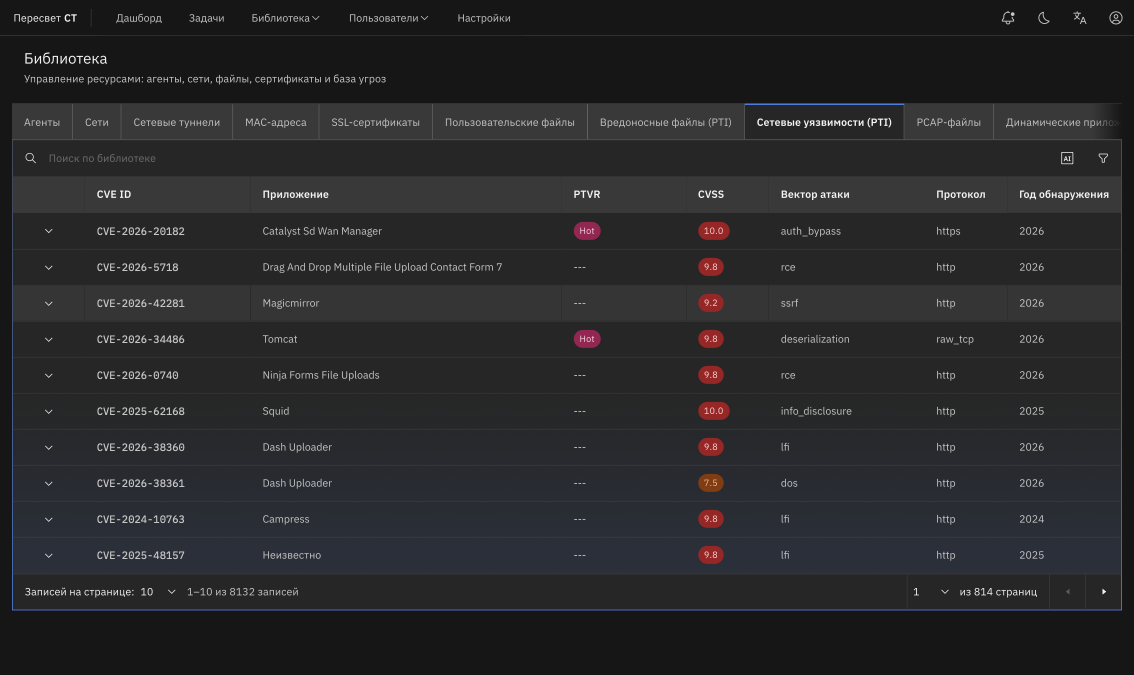
Figure 12 — Dynamic Applications library
A Dynamic Application contains a session list, parameters, defaults, tags, and a description. The Dynamic Applications plugin uses it to replay user scenarios with controlled values such as usernames, identifiers, tokens, URLs, order numbers, and other application data. The plugin section describes the complete preparation and execution workflow.