Installation and Update Wizard
The installation and update wizard (install) deploys Peresvet ST on a new server and updates components in an existing installation. It supports Ubuntu Server 24.04 LTS. The wizard operates completely offline on the target server: it does not access the Internet or run apt-get. All packages and installation files are included in peresvet-st-deploy-*.tar.gz.
Download the latest wizard archive from the Peresvet portal ↗.
Obtaining the Distribution and License from the Portal
Use the portal to obtain the distribution and bind licenses to installed Peresvet ST instances yourself. The target server can remain offline; transfer the distribution archive and license file separately.
-
Prepare virtual machines or dedicated servers that meet the prerequisites.
-
Obtain a portal invitation from the administrator and complete registration.
-
Open the Peresvet portal and download the latest
peresvet-st-deploy-*.tar.gz. If the download button is unavailable, your group does not have permission to download distributions; an administrator grants this permission. -
Transfer the archive to the target server and run the wizard.
-
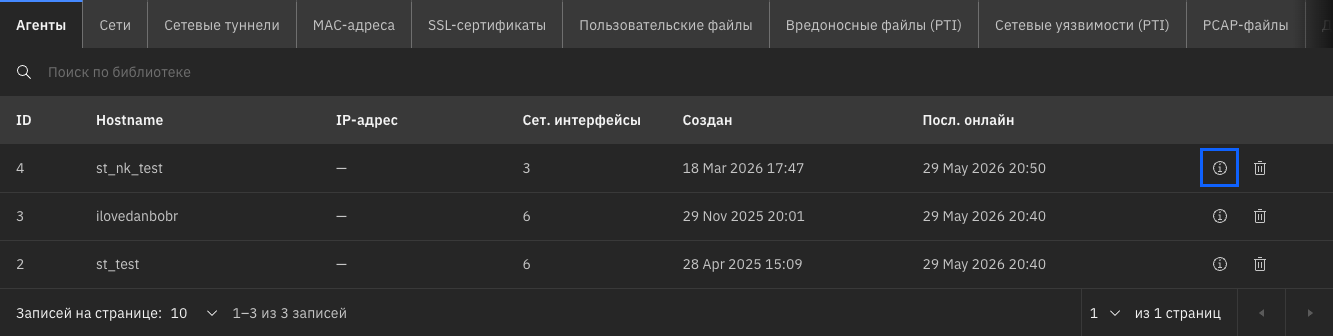
After installation, open the installed Peresvet ST interface, go to Library → Agents, and click Details in the required agent's row.
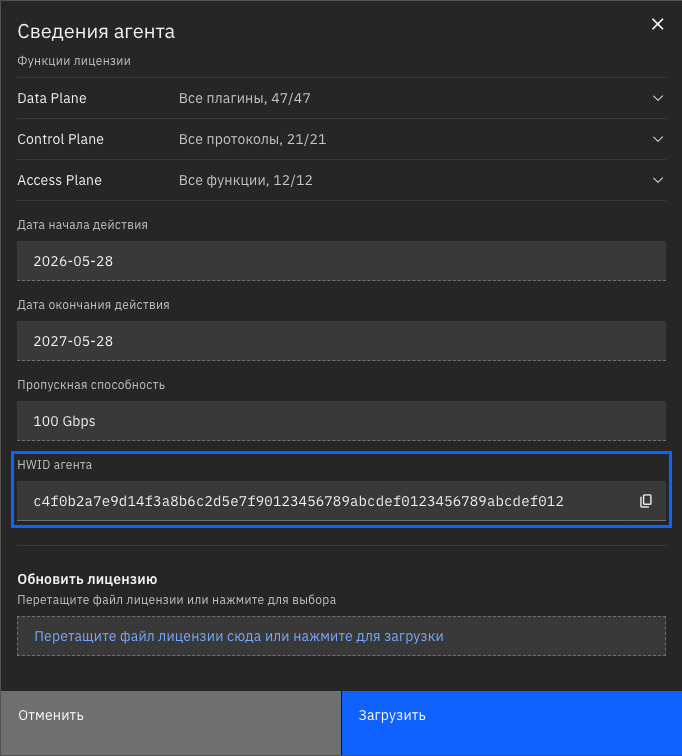
In the dialog, copy Agent HWID or click the copy button to the right of the field.
-
Return to the portal, open Licenses, select an available license, and bind it to the HWID. An administrator assigns available licenses to your user group in advance.
-
Download
license.binfrom the portal and upload it to the corresponding agent in the installed Peresvet ST interface.
Licenses can be assigned to your group in advance. They remain available until bound to an HWID; the license file becomes downloadable after binding.
Prerequisites
| Requirement | Minimum | Recommended |
|---|---|---|
| OS | Ubuntu Server 24.04 LTS | |
| RAM | 4 GB | 32+ GB |
| CPU | 2 cores | 16+ cores |
Free space on / | 8 GB | 32+ GB |
| Access | root or a user with sudo privileges | |
| RSS | Without RSS, stateful scenarios use at most one core. Stateless scenarios are not affected by this limit. | With RSS enabled, stateful scenarios can use all available platform cores. For a VM, see Enabling RSS. |
Only Ubuntu Server editions are supported by the wizard. Ubuntu Desktop and other desktop editions are not supported.
Archive Contents
install                                       installation wizard executable
assets/manifest.yaml                          component and version list
assets/peresvet/*.pa                          controller and agent packages
assets/dpdk/dpdk-runtime-*.tar.xz             prebuilt DPDK environment
assets/thirdparty/ubuntu-24.04/*/*.deb        PostgreSQL, ClickHouse, Grafana, and system dependencies
This is a complete distribution; the target server does not require Internet access.
Quick Start
-
Download the latest installation wizard archive from the Peresvet portal.
-
Transfer it to the target server. In this example,
<ssh-user>is the user used to connect and must havesudoprivileges.
ssh <ssh-user>@<target-ip> 'rm -rf ~/peresvet-st-upload && mkdir -p ~/peresvet-st-upload'
scp ./peresvet-st-deploy-*.tar.gz <ssh-user>@<target-ip>:~/peresvet-st-upload/
- Extract the archive and run the wizard:
ssh <ssh-user>@<target-ip>
sudo rm -rf /opt/peresvet-st-install
sudo mkdir -p /opt/peresvet-st-install
sudo tar -xzf ~/peresvet-st-upload/peresvet-st-deploy-*.tar.gz -C /opt/peresvet-st-install
cd /opt/peresvet-st-install
sudo chmod +x ./install
sudo ./install
If you connected directly as root, you can omit sudo, but install must still run with administrative privileges.
- In the wizard, select Install Components and an installation type:
- Controller —
controller+postgres+clickhouse+grafana(typical metrics-receiver server). - Agent —
agent+dpdk(the host that generates traffic). - Custom — select components manually (
Spaceselects a component).
Every agent requires at least two network interfaces: one for management and controller communication, and another for test traffic generation and reception. An interface bound to DPDK is reserved for high-speed packet I/O and is no longer available to the operating system as an ordinary network interface.
- Complete the configuration form and press
Enterto start installation. Installation time depends on the selected components and disk speed.
Do not use localhost or 127.0.0.1 in Grafana URL or Controller API URL; the service will not start with these addresses. Specify the server's external IP address.
In the form, use Tab/↑↓ to move between fields, Ctrl+R to reveal a password, Ctrl+G to generate a new password, Ctrl+U to clear a field, and Enter to save settings and start installation.
The wizard generates random PostgreSQL, ClickHouse, and Grafana administrator passwords.
-
After successful installation, open the controller web interface at
http://<ip>:8080and sign in with the default credentials:admin@peresvet.local/admin. The system requires a password change at first sign-in. -
Obtain the agent HWID as described in step 5 under Obtaining the Distribution and License from the Portal, bind a license on the portal, and upload the downloaded
license.binto the installed Peresvet ST interface.
Installation Process
The wizard installs the system in several stages:
- It checks the server OS version, RAM, CPU, and free space. This stage reads server parameters only and makes no changes.
- It installs
.debpackages withdpkg -i, extracts Peresvet ST packages, and adds services under/etc/systemd/system/. - For an agent, it installs DPDK under
/opt/dpdk/and configures system libraries. - It enables and starts the installed services.
- It writes settings under
/opt/peresvet/{controller,agent}/, creates the PostgreSQL user and database, applies ClickHouse schema changes, provisions Grafana data sources and dashboards, and restarts services.
The Tools menu also configures hugepages, vfio-pci (binding a NIC to DPDK), and mlx-flap.
The wizard can install controller, agent, postgres, clickhouse, grafana, dpdk, and mlx-ofed. Exact versions are listed in assets/manifest.yaml in the distribution archive.
The wizard does not use Docker, compile software on the server, or reboot automatically. After changing GRUB for 1 GB hugepages or enabling IOMMU for vfio-pci, reboot manually as instructed by the wizard.
Agent Installation FAQ
What Are Hugepages?
Hugepages are large memory pages used by DPDK for packet buffers and fast memory access. A Peresvet ST agent requires them on the machine that generates or receives test traffic through DPDK.
Which Page Size Should I Select?
Keep 1 GB pages when supported by the server or VM. This is the primary option for a high-performance agent.
How Much Memory Should I Allocate to DPDK?
Use as much available memory as practical for 1 GB pages. The page count equals the memory size in gigabytes; for example, 16 one-gigabyte pages reserve 16 GB for DPDK.
If the controller, PostgreSQL, ClickHouse, or Grafana is on the same host, retain enough memory for the operating system and services. On a dedicated agent without a controller, almost all available memory after the system reserve can be assigned to hugepages.
Why Does an Agent Need Two Network Interfaces?
Every agent requires two interfaces:
- management interface — SSH, operating-system access, controller communication, and service data;
- traffic interface — test traffic generation and reception.
DPDK reserves the traffic interface for direct NIC access. Once bound to vfio-pci, Linux no longer uses it as an ordinary interface with an IP address, so it cannot also be the management interface.
Where Can the Controller Be Installed?
The controller can run on an agent host or a separate VM. A separate controller VM needs only one network interface: it manages the system, does not generate or receive DPDK test traffic, and does not require a dedicated DPDK interface.
Verifying the Installation
After installing the controller:
systemctl is-active postgresql clickhouse-server grafana-server peresvet-controller
# all four services should report active

curl -s http://127.0.0.1:3000/api/health
# {"database":"ok",...}
Web interfaces:
- Grafana —
http://<ip>:3000(usernameadmin, password from the installation form), with 25+ dashboards. - Controller —
http://<ip>:8080. Initial credentials areadmin@peresvet.local/admin; a password change is required at first sign-in.
You can also check component state from the main menu under Check Status.
Updating with the Wizard
Run the same installation wizard on the servers where the initial installation was performed. Normally, update the controller first and then the agents.
At startup, the wizard automatically compares installed component versions with those in the new distribution. If updates are available, Update Components appears at the top of the main menu and is selected by default. A component newer than the distribution version is neither updated nor downgraded.
- Download the latest installation wizard archive from the Peresvet portal.
- Transfer it to the target server, extract it to a separate directory, and run
install:
ssh <ssh-user>@<target-ip> 'rm -rf ~/peresvet-st-upload && mkdir -p ~/peresvet-st-upload'
scp ./peresvet-st-deploy-*.tar.gz <ssh-user>@<target-ip>:~/peresvet-st-upload/
ssh <ssh-user>@<target-ip>
sudo rm -rf /opt/peresvet-st-update
sudo mkdir -p /opt/peresvet-st-update
sudo tar -xzf ~/peresvet-st-upload/peresvet-st-deploy-*.tar.gz -C /opt/peresvet-st-update
cd /opt/peresvet-st-update
sudo chmod +x ./install
sudo ./install
- Wait for automatic validation and open Update Components.
- Review the update plan. For each component, the wizard shows the current version, distribution version, and reason for updating. Every detected update is included by default.
- Press
Enterto start the update.
The wizard updates the planned components and their required system dependencies without opening the configuration form or resetting current settings. It adds missing .env parameters, applies ClickHouse schema changes, updates Grafana dashboards and settings, and restarts updated services. Existing PostgreSQL and ClickHouse data is preserved.
If Update Components does not appear, the wizard found nothing that this distribution can update. Make sure that install was started from the latest archive. Use Install Components for initial installation or manual component selection, not for a routine update.
Troubleshooting
| Symptom | Where to look |
|---|---|
peresvet-controller remains activating for a long time | journalctl -u peresvet-controller; normally .env is missing or a URL uses localhost |
| Package installation fails | Last package-installation entry in /var/log/peresvet-wizard.log |
| Wizard menu is displayed incorrectly | Increase the terminal to at least 60×24 |
| Grafana has no dashboards | Restart grafana-server and check /etc/grafana/provisioning/ |
Logs and diagnostics:
cat /var/log/peresvet-wizard.log        # wizard log
journalctl -u peresvet-controller -n 50
journalctl -u peresvet-agent -n 50
cat /opt/peresvet/controller/.env
Additional Command-Line Options
sudo ./install                            # open the installation wizard
./install --version                       # wizard version
./install --help                          # help
sudo ./install --theme=auto|light|dark    # color theme (default: auto)
./install --print-theme                   # print the selected theme and exit
sudo ./install --update-dashboards        # update Grafana dashboards without reinstalling
Theme environment variables:
STI_THEME=light|dark|auto— same as--theme.NO_COLOR=1— disable color (see https://no-color.org).